
And this? This made me laugh ; )

I think that is all! I don't really have too many vices to give up (no, shoes are not a vice...they are a necessity!!) and I think these three little fellas are eminently achievable and nor are they totally selfishly focused on me, me, me!!
There it is! An update. At last!!

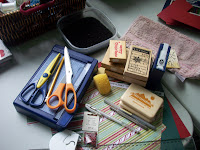 (you will note that my picture also includes some gel pens. I confess that I did not use these...also pictured is my scrubby stamp cleaner and a tatty old face washer to clean my stamps with.)
 Step 3 - Measure a rectangle (or square if that is your shape) a bit smaller than the front of the card, and cut an appropriate number out of the printed paper. Trim with the scalloped scissors as shown in the photo. I have found - via trial and error - that it is best not to snip all the way to the end of the scissors, as they tend to have a little flat bit which will result in some odd shaped scallops. Attach to the front of the card in a centred position, top and bottom.
  Step 4 - Measure another rectangle (or again with the square) out of the contrasting card which is slightly smaller again than the base card. Trim with the scalloped scissors again and attach in a centred position to the patterned paper you have already stuck down.
 Everyone still with me?
Step 5 - Measure yet another rectangle, this time out of the cream card. This will need to be slightly smaller again than the last rectangle you cut. This will be the card onto which you will stamp your images. I find it easier to measure all of these rectangles out, but to NOT cut them out until the stamping is finished. This way I don't have to fiddle with the card too much when stamping and masking.
 Step 6 - Grab your stamps and ink and scrap paper. Stamp your main image onto the scrap paper and allow the ink to dry. Once this is dry, trim the image as close to the edges as possible. This is to create a mask for the next couple of steps. Your mask doesn't have to be too detailed. For example, I have not gone into the tiny details of the mistletoe sprig, but it still gives the effect I am after. Obviously, the two other rectangular stamps were far easier!!
 Step 7 - stamp your chosen images into the rectangles you have drawn on your cream card. I also printed my greeting onto unused card on the edge.
  Step 8 - Grab the mask you have made earlier. Place this as closely over the stamped image as possible. It is advisable to wait until the freshly stamped image is dry before you do this, otherwise you risk smudges! Stamp your music (or text - whatever) stamp over the top of the masked image.


 Step 9 - Once the stamping is dry, using watercolour pencils or markers, colour the image as applicable. The photo illustrates my mistletoe card which had quite a bit of colour, but the other two images I had did not have as much colour. If you use water colour pencils, be careful that the stamped image does not run too much. I used pencils, and as the ink is not heat set it tended to run a little as you are dabbing it with water.
  Step 10 - Once the images are completely dry, cut the rectangles out and trim with the scallop scissors. Also trim your greeting. I have stamped my music image over my greeting without using a mask.
  Step 11 - Now the messy bit. Using a small piece of sponge, apply ink to the edges of the cream coloured card to make it look 'aged'.
 Step 12 - At this point, you could use a punch and attach eyelets. I started to do this, but was having eyelet issues, so only made one card like this. If you do use eyelets, you can thread ribbon or embroidery thread or similar through them. Otherwise, skip this step.
 Step 13 - Attach your stamped images to the front of your card!! And voila! you are done.
 I made six of these for a Christmas card swap that I joined, and I think they turned out rather lovely (if I do say so myself!!!)
Hmmm, a bit Beatles heavy today. Not that that's a bad thing!!
